Friday, December 18, 2015

R2-IQ: On Display

Build Day 52:

R2 On Display
"The" movie is in theaters.  Today was my target day to finish.  52 days in, I can present it as complete.  But, like many projects, it will never really be complete.

I brought R2 into work to show him off.  Everyone loves him.  I've been passed in the hall many times and the normal mindless greeting of "how are you" has been replaced with "very cool".

That makes me smile.


New design for shoulder
Last night, I totally rebuilt the arm, and how it connects to the body.  I don't have any good pictures right now.  Generally, I redesigned it so the arm would split in two pieces and the upper arm would remain attached to the shoulder.  That allowed me to build a more rigid pivoting point, but still allow disassembly for transport.
R2 Standing on 2 legs
I still have a number of things I want to work on.

  1. Fill in the gaps in the head
  2. Replace the shells for the outside feet
  3. Build a shell for the third leg
  4. Motorize raising the third leg
  5. Rebuild the bottom skirt so it is lower
  6. Add more decorative stuff to the body
  7. Find out why the head-turn motor is so loud
  8. Attempt to speed up movement
  9. Fix the colors on the shoulders
  10. Add better sounds & lights (arduino) 
Even with all that, it's still good.  I think I can say I will never retire it.

While the build is "complete", this is where the journey really begins.  Right?

Wednesday, December 16, 2015

R2-IQ: Photoshoot

Build Day 50

Standing on three legs
I'm trying to take some good pictures that I can share.

I went down in the basement, turned on all the lights, and one of them proceeded to stop working.

So, the pictures are not as well-lit as I want, but it will have to do, for now.

Front View
Standing on two legs

Tall looking droid


Tuesday, December 15, 2015

R2-IQ on TV

Build Day 49

Looking good
Our visit to the Game Preserve was captured and broadcast last night.  Today, the news was loaded with stories that started, "In anticipation of the new Star Wars movie..." (someone did something)

So, I did my part.  Check out the story, which is slightly longer than the ad you must watch at the beginning.

WLFI News Story

A couple corrections:
1) The story starts by him saying "...the 45 robot...", which I think should have been "... the 45 day old robot..."
2) I said I'd been working on it for 45 days.  It was actually 48.
3) The total number of pieces is more like 4,000 than 40,000.  About 2,400 of those are pins.
4) I said I was a robotics coach.  They said I'm a teacher.  OK...

Highlights of the night:
A) Matt helping me assemble it.
B) Kurt reminding me of the items on my list (weight, part count, creation time, cost)
C) The people present expressing how cool it was
D) Seth being impressed that we got TV18 to show up.


Monday, December 14, 2015

R2-IQ at the Game Preserve

R2-IQ as it looks right now

Build Day 48

Tonight, we'll be taking R2-IQ to a local gaming store, the Game Preserve, to display.

At the same time they will be playing several Star Wars games like IMPERIAL ASSAULT SKIRMISH, X-Wing, Armada, and/or Star Wars LCG.

Stop in and check it out, or visit the GP Facebook web site.

Stats:

Weight: 43lbs
Material: VEX IQ robotic construction parts
Part Count: 3,300 pieces

Friday, December 11, 2015

R2-IQ: Broken Arm

Build Day 45:

Outline of feet
My latest task was to create a shell for the feet which will go on the outside legs.

The feet themselves are not going to move (like the real R2).  The shell is going to move to keep the feet looking flat to the ground.
Standing R2-IQ
I did a full assembly of the current version.  I still need to fill-in the head and finish up the feet.  Beyond that, a few more decorative items, and it will be great.

Fallen Hero
I put it into three-leg mode, and drove it around a bit.  Turns out the new better-looking arms are not as rigid as the old ones.

One of them gave out, just below the shoulder, and the whole body crashed to the floor.
Broken leg
The only thing that was really damaged was the arm.  The whole robot came down on it.

I don't really mean it was damaged.  It came apart.  When I put it back together, it will be stronger.

We can rebuild him.  Better.  Stronger.  Faste...  well, the same speed.  (showing my age?)
Broken Pin
There was one pin in the body that was broken.  It took me about 10 minutes to snap the body back together.  Five of that was trying to figure out why two plates wouldn't go back in place, because there was a bent pin between them.

Just to be clear, this was not a part failure.  It was the result of the entire robot falling over.

Wednesday, December 9, 2015

R2-IQ: Getting More Difficult

Build Day 43:

Progress is hard to obtain, now.  I'm not sure I'll be happy with how it looks (compared to an actual Artoo).  Most will see it an say it looks great, but I can't get the detail I really want in the curved exterior, and the head is going to be a mess.

Building a round robot with square parts is not easy.

Tuesday, December 8, 2015

R2-IQ: Head Turn

Build Day 42

Failed assembly (doesn't fit)
Today I was working on mounting the head, and getting it to turn.

At this point, it's going to turn slow.

My first attempt would not fit in the body.

Head Internal
There will be one axle that goes up through the body and into the head.  That should keep it pretty straight.
Head connection
The bottom of the head has a couple plates that line up with a plate on the "head-turning-assembly".  This will make it easy to attach and remove.
Head motor assembly
The final assembly has a worm-gear drive, and two roller-wheels  for the head to sit on, to allow it to turn more easily.

Monday, December 7, 2015

R2-IQ: Weekend Progress

Build Day 41:

Prototype shoulder curve
I spent a lot of time over the weekend, and made very little progress.

My main task over the weekend was building the legs.  I had some prototype legs which were mainly created for their length.

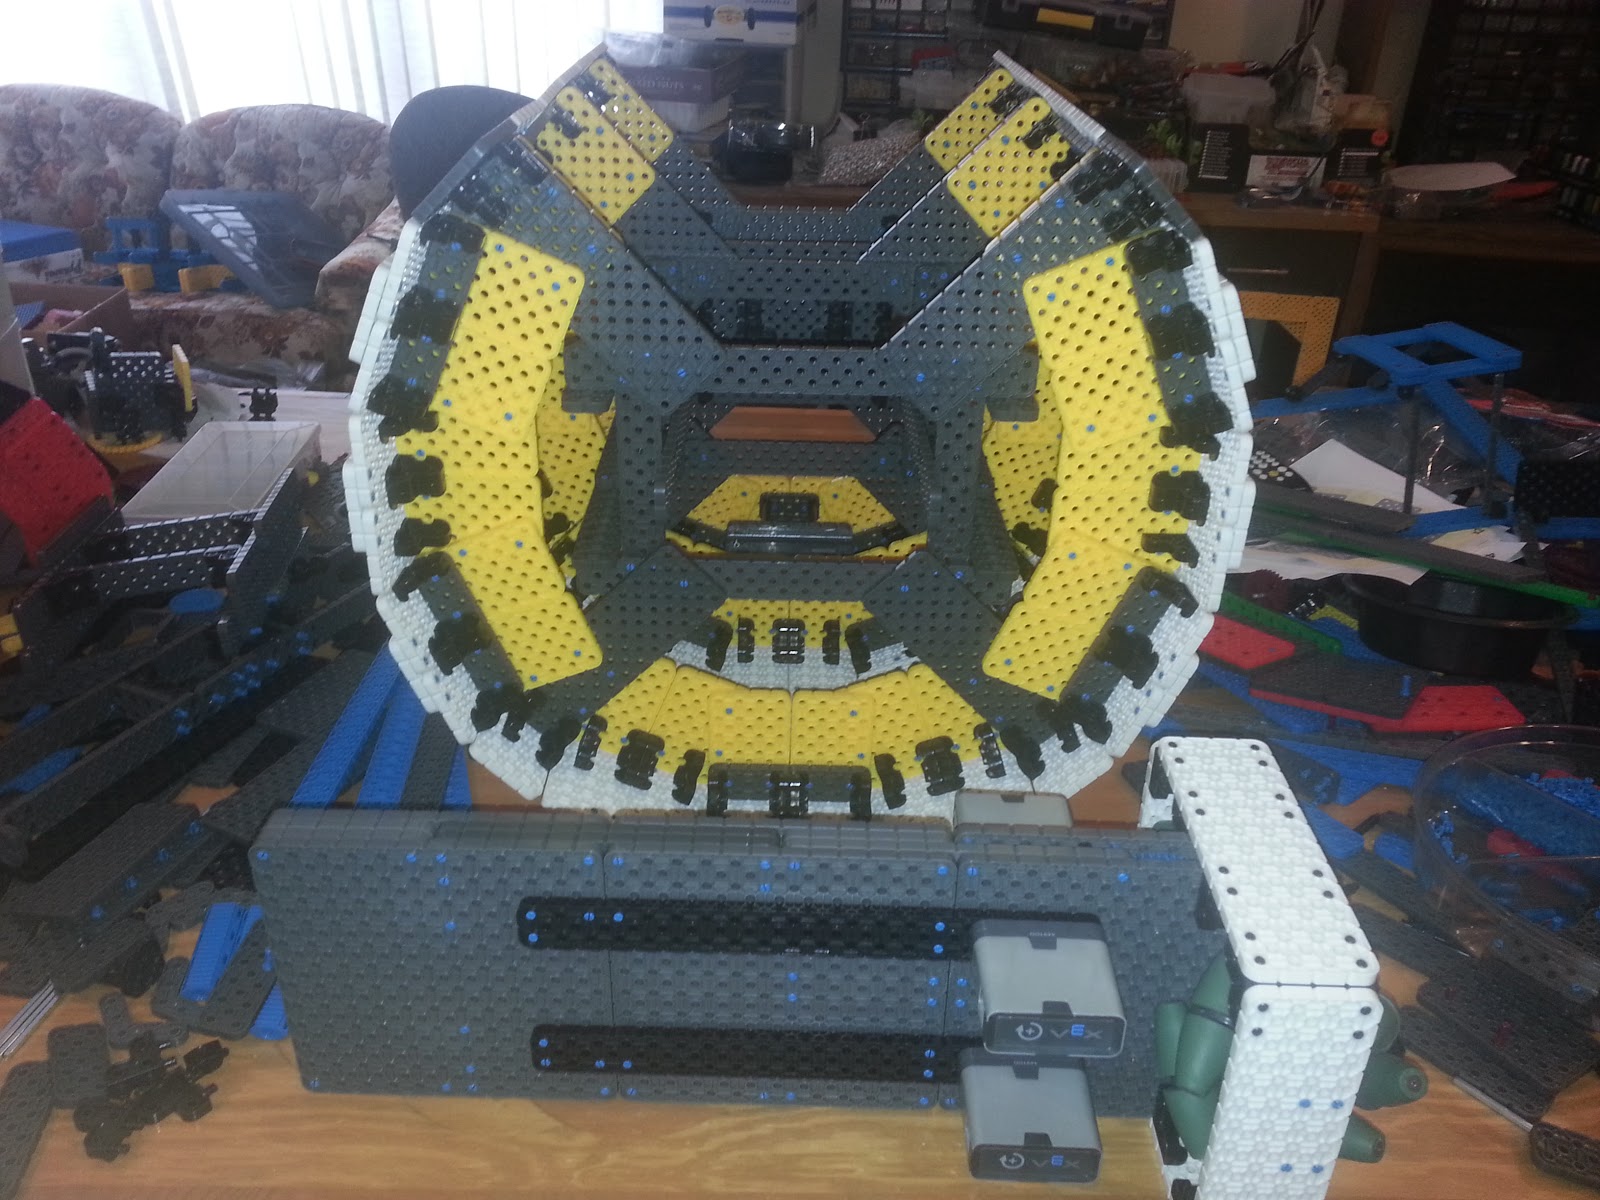
I spent a great deal of time trying to create a good curve at the top of the shoulders.
Shoulder and top of leg
Once I found a good curve, I built it up and discovered the internal structure of the curve hit the internal structure of the shoulder.  I spent a lot of time trying to tweek it, and finally found a way to make it work.
Building a new leg from the old
Then I was able to take apart the old legs, and create a new one.
Standing on the new leg
There are still parts of the leg that need filled in.  I should be getting the new parts in a couple days.  Mainly need some 4x4 plates in white, which I somehow did not put into my original order.

If you look close, you'll notice I've only made one new leg here.

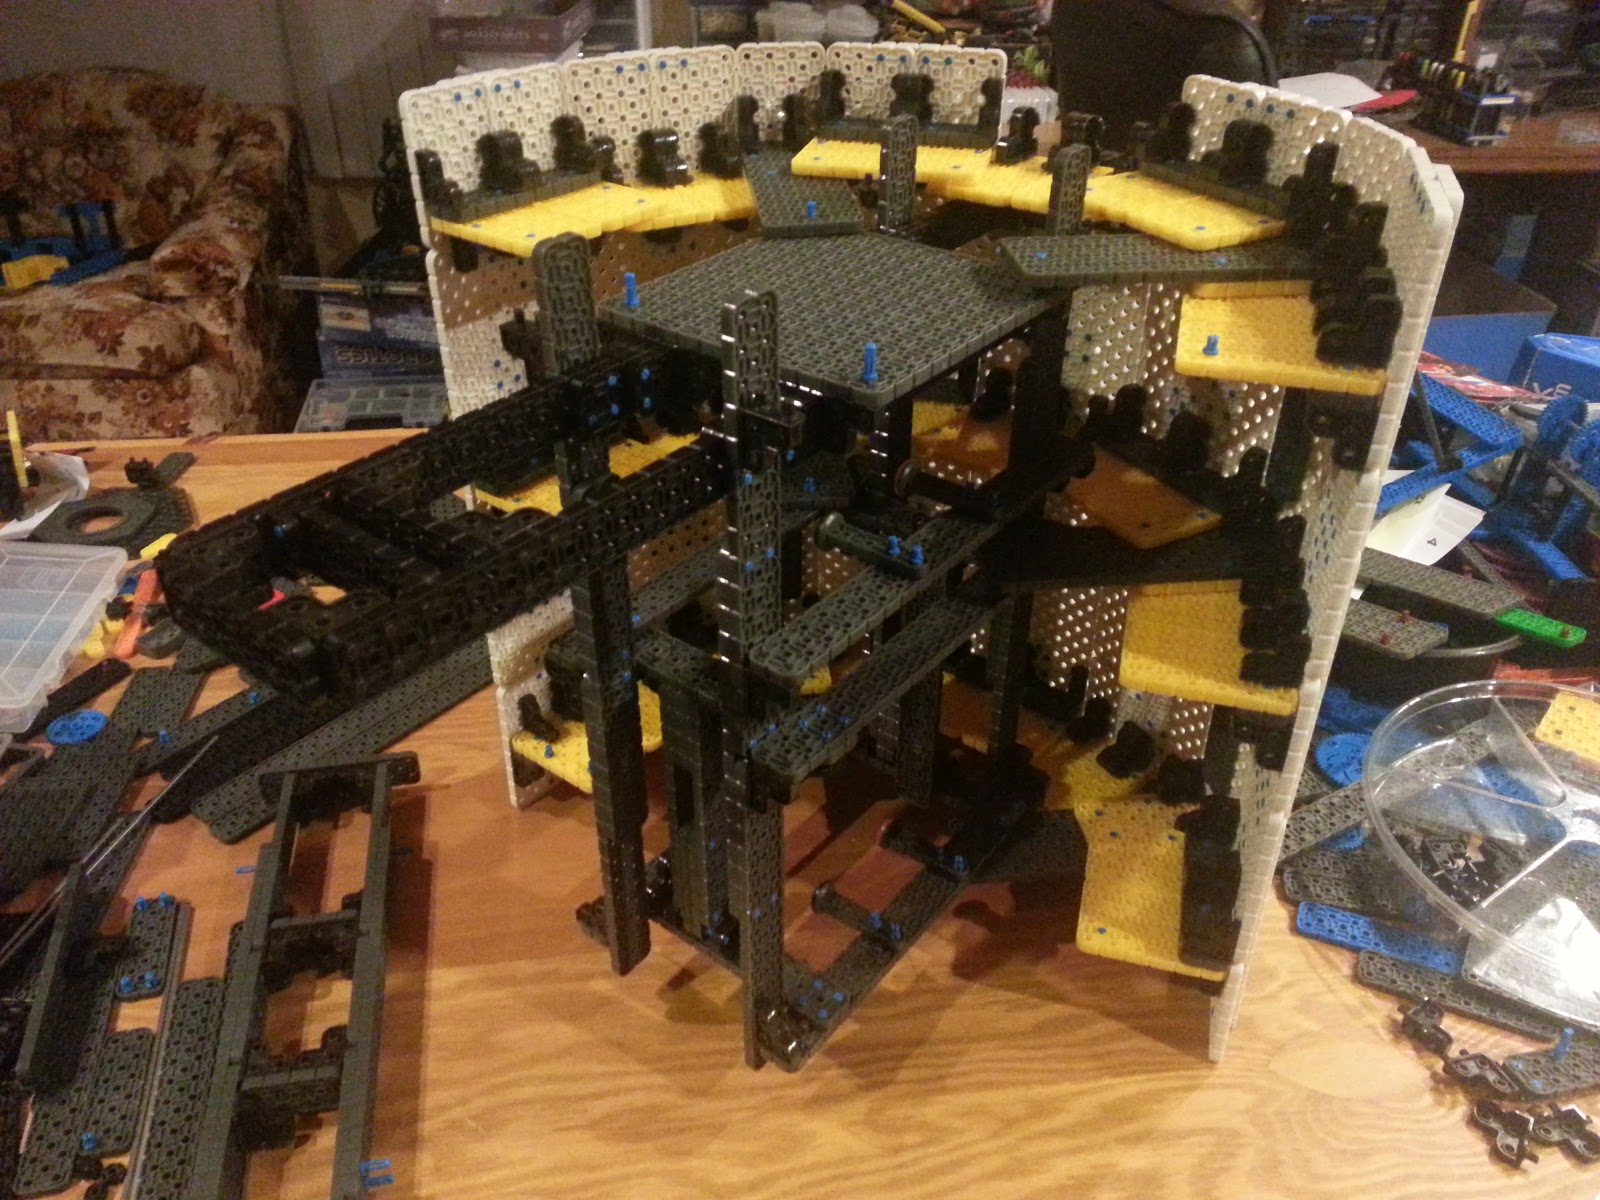
Lower Flange supports

The bottom of R2 has a flange that sticks down on the bottom.  I had to pull the body off the bottom ring, reorient a couple angle connectors, and reattach the body.

Then, I was able to install supports for the flange.

(not sure that's the "correct" name for that part.)
Lower Flange

Once I got all the supports installed and mounted the white pieces...  I didn't like it.

I don't think this part will change in the next couple weeks.  I'll have to live with it.
R2-IQ Pieces
One challenge I will face with R2-IQ is transporting it.  When I break it down, it's pretty light.

In order to take off the legs, the shoulders need to be removable.  I will have to see if they are sturdy enough when they are easy to remove, or if I must make them harder to remove, and more sturdy.

(I just realized I put two of the leg-buttons on wrong, so both legs look the same.  will fix that)
Modified Head
Using only VEX parts, I don't think I'll be able to put as much detail into this as I would like.  There aren't enough "decorative" parts, like there are with LEGO.

Do I want more decorative parts?  Not really.
Standing on two legs
Here's R2-IQ standing on two legs.

Sort of.

I didn't bother to raise the third leg for this picture.  The brain is not attached (see loose wires).
Standing on three legs
R2-IQ can stand on three legs.

I still need to build a shell that goes over the outside feet.  The shell will be able to swing, to make it look like the foot is flat on the ground, even though only one of the two wheels will be rolling.

Monday, November 30, 2015

R2-IQ: Rolling on three legs

Build Day 34:

Here's the next test of the robot rolling.

I don't want the ankles on the outside legs to bend.  It will only use the 2nd set of wheels when it's in 2-leg mode.

Also, I already changed the third leg, so it looks like it's flat on the ground.


It does a good job of rolling around, until I try to switch back to 2 leg mode, and I don't stop when it gets a bit off balance (one drive wheel off the ground).

I did find a couple weak spots that needed to be tightened!

R2-IQ: New Shoulders

Build Day 33:

Shoulder V3
I started the day with version 3 of the shoulder.  The problem is that it will twist when the legs move back (3 leg mode). In this version, there is a bit less twist, but it was very tough to build the body around it.  I ended up with several "odd" distances, and "even" length pieces, so it would not easily fit.
Many pins in V4
After fighting with it for a while, I decided to create yet another version of the shoulders.

My plan was to make a very solid piece that could not twist.  It would have lots of pins.
Shoulder V4
This version would also be better designed to fit into the skin of the body, creating a more solid structure.

Modified Body to secure shoulders
The top ring in the body had to be rebuilt, to sit on top of the shoulders, and also add support to the rest of the skin/body.
Solid body
Final cut-away, before adding the front skin panel.
Not-so-solid head.  (prototype)
When driving, I sometimes get a little aggressive.  The outside legs currently don't have anything to hold them in place.

During this crash, the body held up pretty well, but the head did not survive.  That's OK, it was still just a prototype.

R2-IQ: New Frame

 Build Day 32:

New Frame ready for install
 I built a new frame to hold the third leg.  On this day, I would destroy the old frame, and mostly take apart the old body to wrap it around the new frame.

Bryan came over to build a better looking leg.  I told him it looks great.  No pictures.


Body with new frame

Crack open the body

Body parts all over the place


R2-IQ: Progress Slowing

Build Day 31:

New frame to work with new wheel
This is where progress really seems to slow down.  Ignoring the fact that it was Thanksgiving (and I did spend time with my family) I don't feel like I got much done.

I built a new center wheel.  It won't fit into the current frame, so I'll have to rebuild that.

The new frame has new, stronger shoulders.

New center wheel assembly

Tuesday, November 24, 2015

R2-IQ: Broken

Build Day 28:

Bent Axle
Over the weekend, while I was driving R2 around the show, it would turn to the right, but not to the left.  When I would try to turn left, the chain would jump on the gears on the center leg.  I didn't really understand why it worked one direction, but not the other.

Last night I decided to replace the chain with gears, and while rebuilding the wheel, I discovered one of the axles was very bent, causing the wheel to turn poorly.

Hopefully, I'll get the leg rebuilt (new design) and attached, tonight.

Monday, November 23, 2015

R2-IQ: First Show

Build Day 27:

R2-IQ at it's first show
Over the weekend, we attended Brickworld, a large show with lots of cool displays.  R2 spent the time surrounded by lots of LEGO Star Wars items.

Unfortunately, that didn't allow me any time to get any real work done on him.

However, it was a very good indication of how people will react to the droid.  I had several kids want to touch it, and even hug it.

I'm looking forward to making more progress in the coming weeks.

Thursday, November 19, 2015

R2-IQ: All coming together

Build Day 23:

Frame & Body, separate
I had a very productive night last night.  I started by rebuilding the shoulders to support all three legs.

With the new shoulders, the legs have a hard-stop at 0 degrees swinging forward (standing on two legs) and at 36 degrees swinging backward (standing on 3 legs)

I tried using magnets to hold the third leg in place, but that didn't work.  It's too heavy.

I had to split the body into four pieces to insert the frame.

1/2 body

Frame with 1/2 body attached

Frame with 3/4 body

Adding last section of body

Body with shoulder(s)

Frame inside body

R2 with head & 2 legs

R2 in 3 leg mode

Playing with color

More color